 BLOCK STITCH BABY BLANKET
I saw this pattern floating around the internet and thought it looked amazing. I was looking for just the right pattern to make my new niece or nephew a baby blanket. That's right, I am about to become an aunt for the 5th time! I have faithfully made a blanket for each of the other babies and I was not going to balk on tradition just because my life has become rather crazy. After all, it is things like this that I will be remembered for, not my clean house or my mad web design skills.
After a quick search, I found out this is called the block stitch. Guys, this is incredibly easy. It is two repeating rows that you do ad nauseam until you are satisfied with the size of your blanket. There really is no 'end' to it, since the DC portion (the white part in my blanket) creates a nice edge on its own.
This pattern is unique (to me) because you only turn your work every other row (only turn when you begin the DC row.) So, you work right to left with white, add a stitch holder to keep your work from unraveling and then instead of turning, you slide your work across your lap and begin again on the right side, adding a colored row. There are all kinds of ways you can join yarns to ensure you have a clean color change, but as you are not adding to a stitch (like when you add a color as you turn your work) this is very different. If you just follow the instructions as presented in the video below, you will have a nice looking blanket, but the tails will be floating on top of the blanket and it will be confusing to weave in your ends. This was the only thing I found difficult about the project.
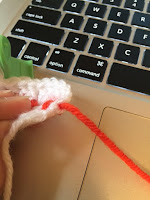
I did come up with a good method of changing rows so that I set myself up later for easy and seamless weaving.
 |
A sample of what your work will
look like with your foundation row
and one DC row complete.
|
 |
| What your work should look like after you have completed your 2nd DC row (with tails done as above.) |
 |
| A side view of what the tail should look like if done as shown above. |
 |
Weaving in the tails is now easy!
Simply go into the next gap above
where your tail comes out and weave
until you are satisfied it will hold.
|
 |
| This is what your edge will look like after your tail is woven in. It is clean and neat. |
The edging I chose to do on this blanket is SUPER simple. The first and last rows of DC serve as the first round of edging for the top and bottom of the blanket. All I did was repeat that same stitch on the sides, doing 3 DC in every space between rainbow colors (see image to left.) On the corners, I did add a ch3 and then join it with a slip stitch to the next side. After all edges had a 3DC pattern, I simply added a sc border to the entire project to give it a seamless look, joining with a slip stitch to finish it off. For the corners on this round, I did 3SC in the corner stitch to give it a nice, sharp edge.
Here is the video I followed to learn the basic stitch. She explains things really well and I got the hang of it quickly. I didn't finish the video because I forgot to go back to it once I was confident in the stitch.
This entire project took me about three days, but I am a work at home mom of a two year old and there were a lot of distractions. If you have more time to concentrate on your work, I'm sure it would work up a lot faster than that. Below is a picture of my completed project.


No comments:
Post a Comment
I want to hear from you! Leave a comment here.